Great tasting Recipes: 韓式泡菜炒飯 KIMCHI FRIED RICE
Healthier Recipe: 韓式泡菜炒飯 KIMCHI FRIED RICE. Kimchi Fried Rice, or Kimchi Bokkeumbap (볶음밥), is a simple, delicious fried rice recipe that's made with mature kimchi, rice, and just a handful of other ingredients. The trick is in how the ingredients are combined, which can turn it into one of the most flavorful rice dishes ever. Kimchi fried rice or kimchi-bokkeum-bap (김치볶음밥) is a variety of bokkeum-bap ("fried rice"), a popular dish in Korea.
 To make this kimichi fried rice recipe, fresh Winter napa cabbage is salted until it wilts, then coated with a fiery concoction of dried hot pepper paste and powder While kimchi typically is eaten in conjunction with rice, a protein, and other banchan (side dishes), sometimes a taste this bold must stand on its own. Kimchi fried rice (bokumbap or bokkeumbap) makes for a simple meal that helps you use two items commonly found in Korean pantries and refrigerators—rice and kimchi. This recipe is humble food that is mostly enjoyed at home, but you might also see it in some casual Korean eateries. All that you should create prior to when cooking food 韓式泡菜炒飯 KIMCHI FRIED RICE using 4 ingredients and 8 steps. This you must create it.
Ingredients of 韓式泡菜炒飯 KIMCHI FRIED RICE
Inside preparing procedure a person require some crucial seasonings. In the event that now there is one area that is certainly lost next the actual result are not as per your expectations. To commence, you are able to make some of the spices below.
- You must have 1 cup of – rice.
- You need 1 pack of – pork / chicken / beef bulgogi.
- You need 150 grams of – kimchi.
- You must have 2 of – eggs.
Kimchi Fried Rice – easy fried rice made with Korean kimchi. Kimchi adds a spicy and pungent taste and absolute best. Whenever I have extra kimchi, I would make kimchi fried rice, which is one of the best fried rice in the world! It's a simple and unassuming dish that encapsulates the unique flavors of Korean cuisine – including the famous Kimchi!
Instructions of 韓式泡菜炒飯 KIMCHI FRIED RICE
To obtain best success, make sure you continue with the baking guidelines along with these 韓式泡菜炒飯 KIMCHI FRIED RICE accurately
- Cook rice the day before / or / on the same day but earlier.. In order to cool the rice before frying.
- Heat some oil on pan, stir fry bulgogi.
- Once bulgogi meat is about 80% to 90% cooked, add in rice.
- Stir fry well to mix bulgogi and rice properly.
- Add in kimchi and continue to stir fry (I used Gana kimchi – personally feel that it's more delicious that bibigo's despite that bibigo is more well known).
- Adjust taste using fish sauce / soy sauce.
- Use separate pan to cook sunny Side up (or if you want to use the same pan, you may cook the egg first before cooking the bulgogi 😉😉).
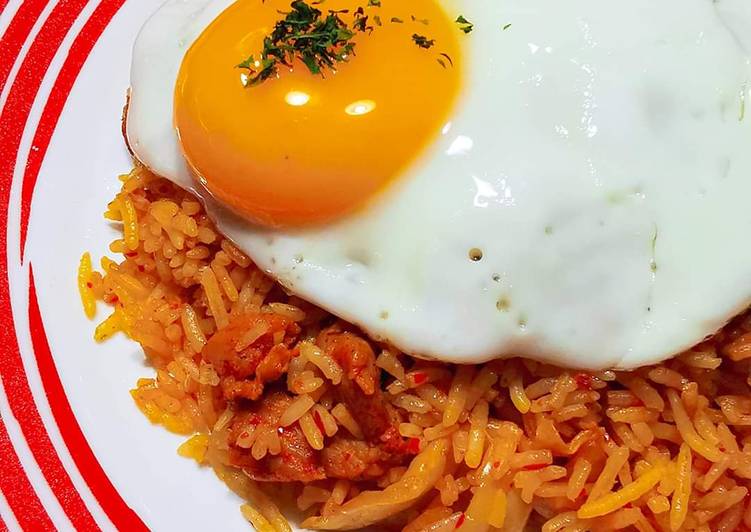
- Garnish with dried parsley and enjoy!! 😋😋.
Kimchi Fried Rice is a really simple and easy dish that's bursting with flavors of sour kimchi. And the bits of egg and pork adds richness while the perfectly crusty burnt rice adds an awesome crunchy texture. Use a non-stick pan with medium fire-add water, hot rice, hot pepper paste. How to cook Kimchi Fried Rice. Place bacon in a wok over medium heat.
The crucial element you must do before cooking any vegetable is to clean them thoroughly. You will do not no that there is bacteria lingering on the fresh vegetables so we definitely cannot see them in the naked eye. It is additionally important to launder them for we can also never recognize if chemicals were sprayed on them. Without the right cleaning some of the chemicals maybe mixed into our food with regarding intoxicating us that could lead to health problems.
It is recommended this is not to overcook your vegetables so that they could well be crunchy without mushy. Cooking it just right would also enhance the dishes especially if you utilize bright colored veggies that tend to make any dish look so tempting to eat.
In to 韓式泡菜炒飯 KIMCHI FRIED RICE, just how do you cook with all the recipe above? If you haven’t felt the best thing about these results, it is possible to the creations to match your taste.
Source : Cookpad.com